Aviation: Chapter Ten
Type Rating — Citation X
Type Rating — Citation X

Becoming a flight instructor was a long journey that involved a lot of tests. Below are the flight paths of my check rides over the past two years. Interesting to see the styles of each.

Private Pilot

Instrument Rating

Commercial Pilot

Commercial Multi

CFI End of Course

CFI

CFI-I
Certificated Flight Instructor - Instrument

Certificated Flight Instructor


This is just my way of doing XC planning. Yes, I’m aware that ForeFlight can do everything, but for training purposes, I prefer to treat ForeFlight more like a paper chart. I also prefer using a paper navlog in flight. This method is a great way to use technology without truly relying on it to do all the calculations for you.
Also, when planning a shorter cross-country flight (something containing 5 checkpoints or so), I’ve been able to knock out an accurate navlog in 15-20 minutes using this method.
Through this example scenario, the flight we’re planning is just a couple hours in the future. Because the winds can (and most likely will) change without notice, avoid trying to plan everything until closer to your departure time.
EFB (I highly recommend ForeFlight)
E6B (I prefer the ASA CX-3 — feel free to follow along with the online version)
Paper NavLog (I’m used to the Jeppesen format)
AFM or POH (this example uses the DA40 NG AFM)
Simply open the Flight Plan Editor in ForeFlight and input your departure and destination airports. This draws a direct route between the two.
For this example, I’m using KIND to KRID. Richmond Municipal Airport is a wonderful little spot in Indiana with friendly staff and a reliable courtesy car. You should most certainly stop in and visit The Tin Lizzie Cafe for breakfast or lunch.
Next, set the departure time. This will enable ForeFlight to pull in the most accurate weather information.

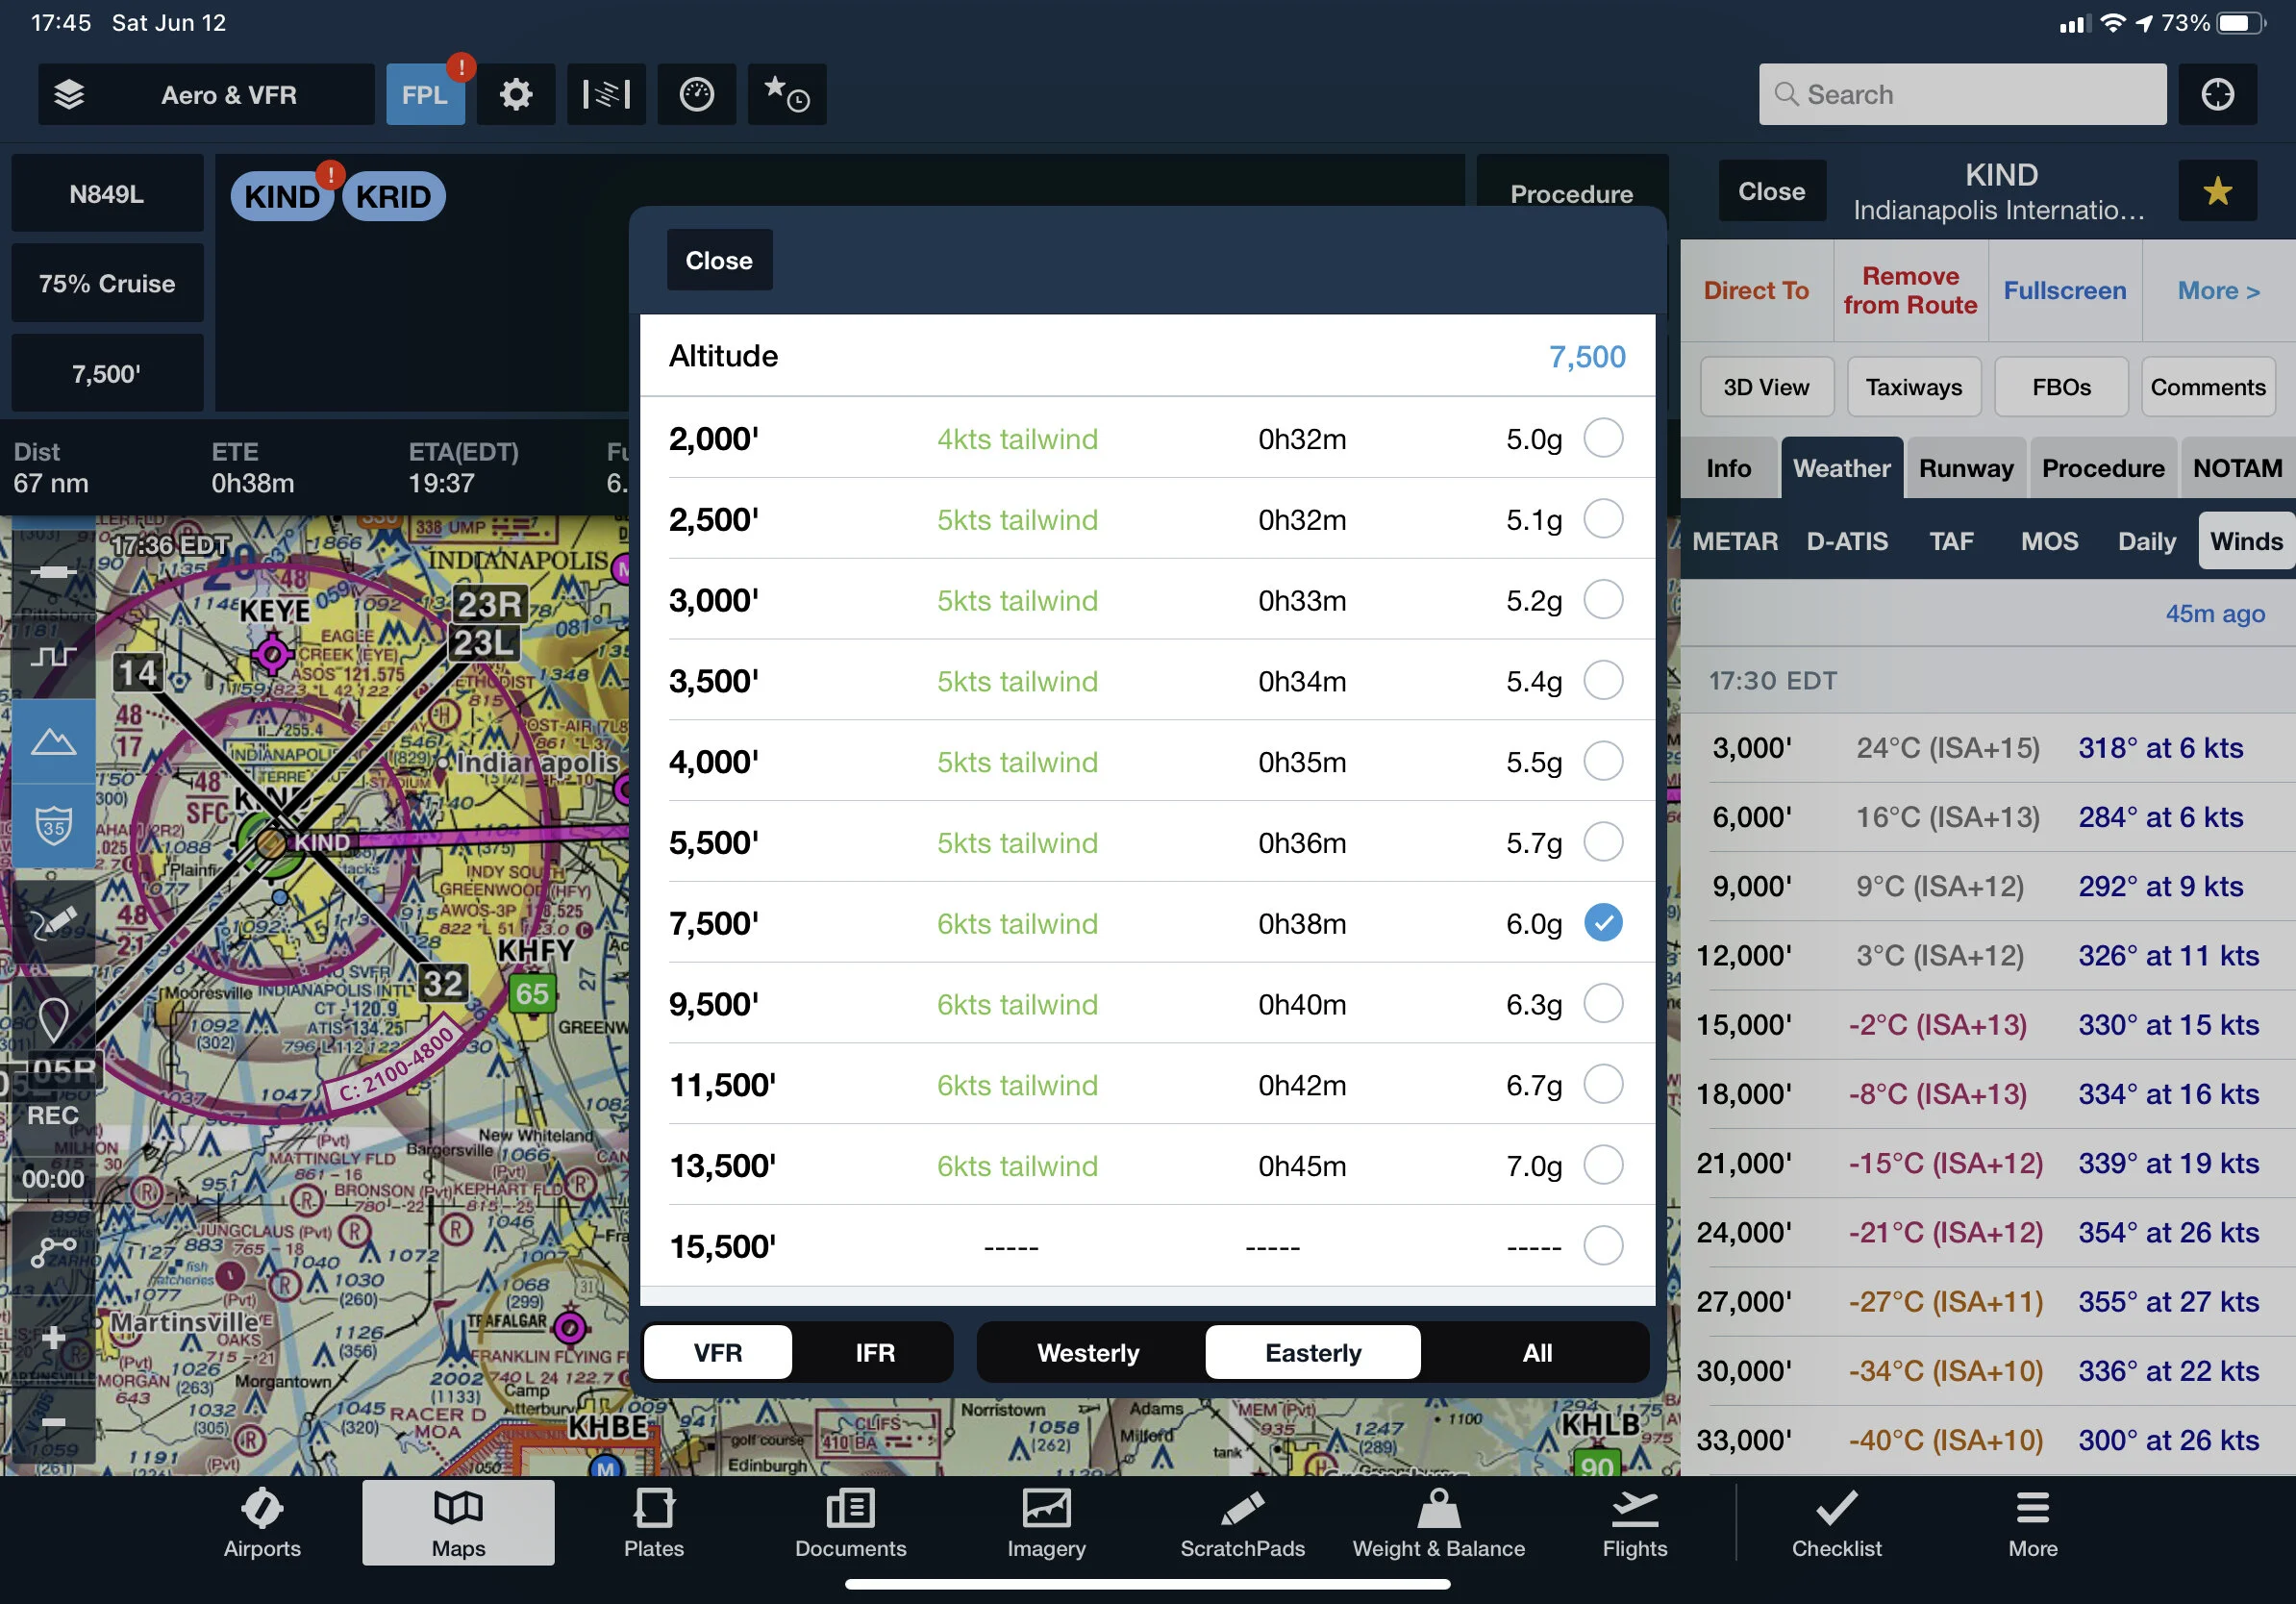
Select the best altitude for your route. Some things to consider are more favorable headwinds or tailwinds, fuel burn, obstruction clearance, checkpoint visibility, glide range, turbulence, and cooler temperatures aloft.
For this scenario, since it’s incredibly hot out today, I’m electing to fly at 7,500’. The winds aloft say it’s 16° C (61° F) at 6,000’ and 9° C (48° F) at 9,000’. While this isn’t a long flight by any means, when it’s 33° C (91° F) on the surface, I’m quite happy to fly higher.
Open the AFM and calculate Time, Fuel, Distance to Climb, using a close approximation. Yes, you can interpolate and be more precise but I’ve had good results with my simplistic method.
A downside to starting a cross-country flight out of KIND however is that they will most likely have you maintain an altitude at or below 3,000’ until you’re clear of the airspace and you won’t get sent on course until they’re ready to vector you that way. If you want to go the extra mile, you can calculate one top of climb for this initial climb out and a second for your final altitude but we’ll keep it simple for this scenario.
I always try and fuel up the aircraft with full tanks and plan for a max takeoff weight of 2,888 lbs. If you’re lighter, plan accordingly.
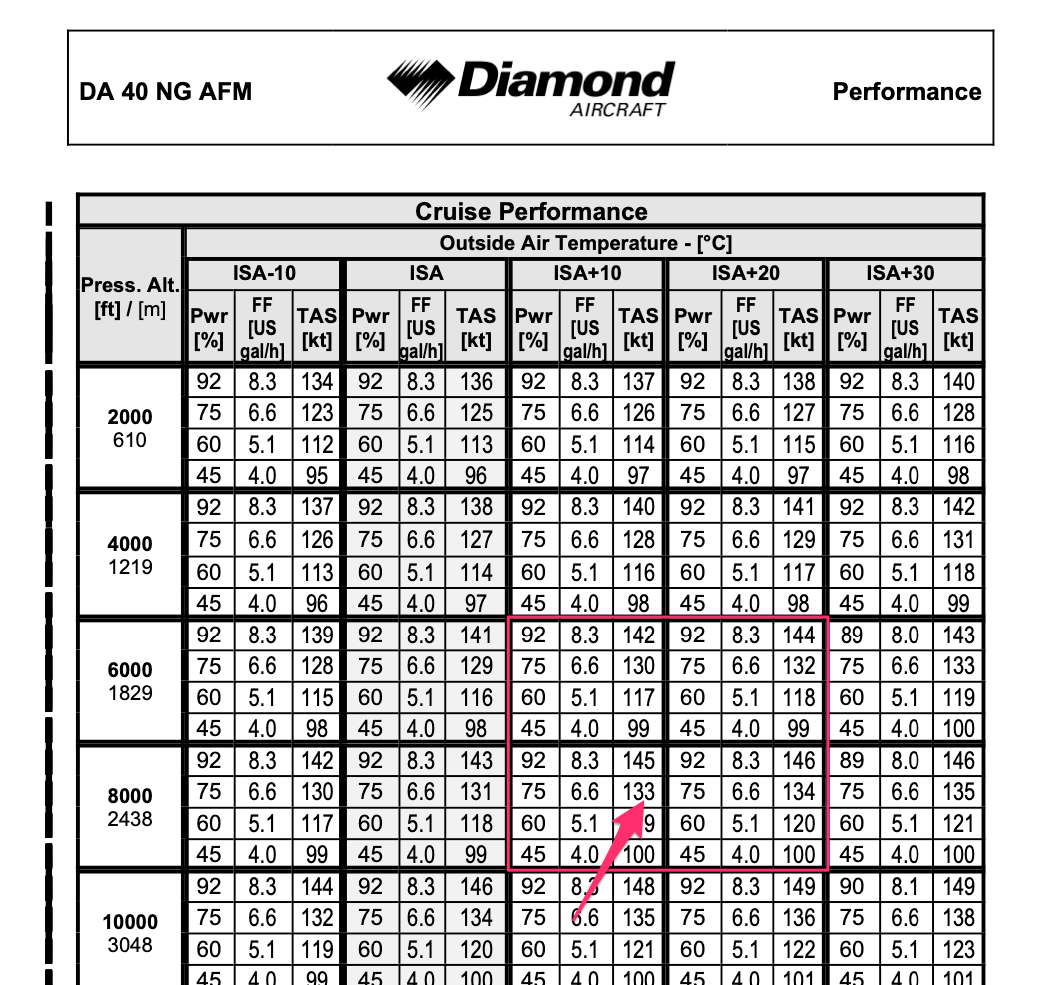
Since we’ll climb to and cruise at 7,500’, I’ll use the data for 8,000’ in the AFM and “massage” the numbers just slightly.
Right out of the book, it says it will take us 13 minutes, burning 1.8 gallons, and covering a distance of 19 miles to reach 8,000’. I’ll knock that down to 12 minutes, 1.6 gallons, and 18 miles as a rough estimate for 7,500’.

The AFM lists the temperature at 8000’ as -1° C but from our planning, the winds aloft at 9,000’ are 9° C, which means we need to adjust things a little more. Again, we’ll keep it relatively simple.
The AFM does offer this note: “Distances shown are based on zero wind. Fuel for start, taxi and take-off not included. Add 5% to the time and fuel and 10% to the distance for each 10° C (18° F) increase in OAT.”
Adding 5% to our 12 minute climb brings our new climb total to 12.6 minutes. Let’s round that 12.5 minutes.
Adding 5% to our 1.6 gallon fuel burn in the climb brings our new total to 1.68. We’ll round that up to 1.7 gallons burned.
Adding 10% to our 18 mile distance covered in the climb brings our new total to 19.8. Round up to 20 miles.
Now with our time, fuel, and distance to climb data, we can start selecting our checkpoints on our sectional.
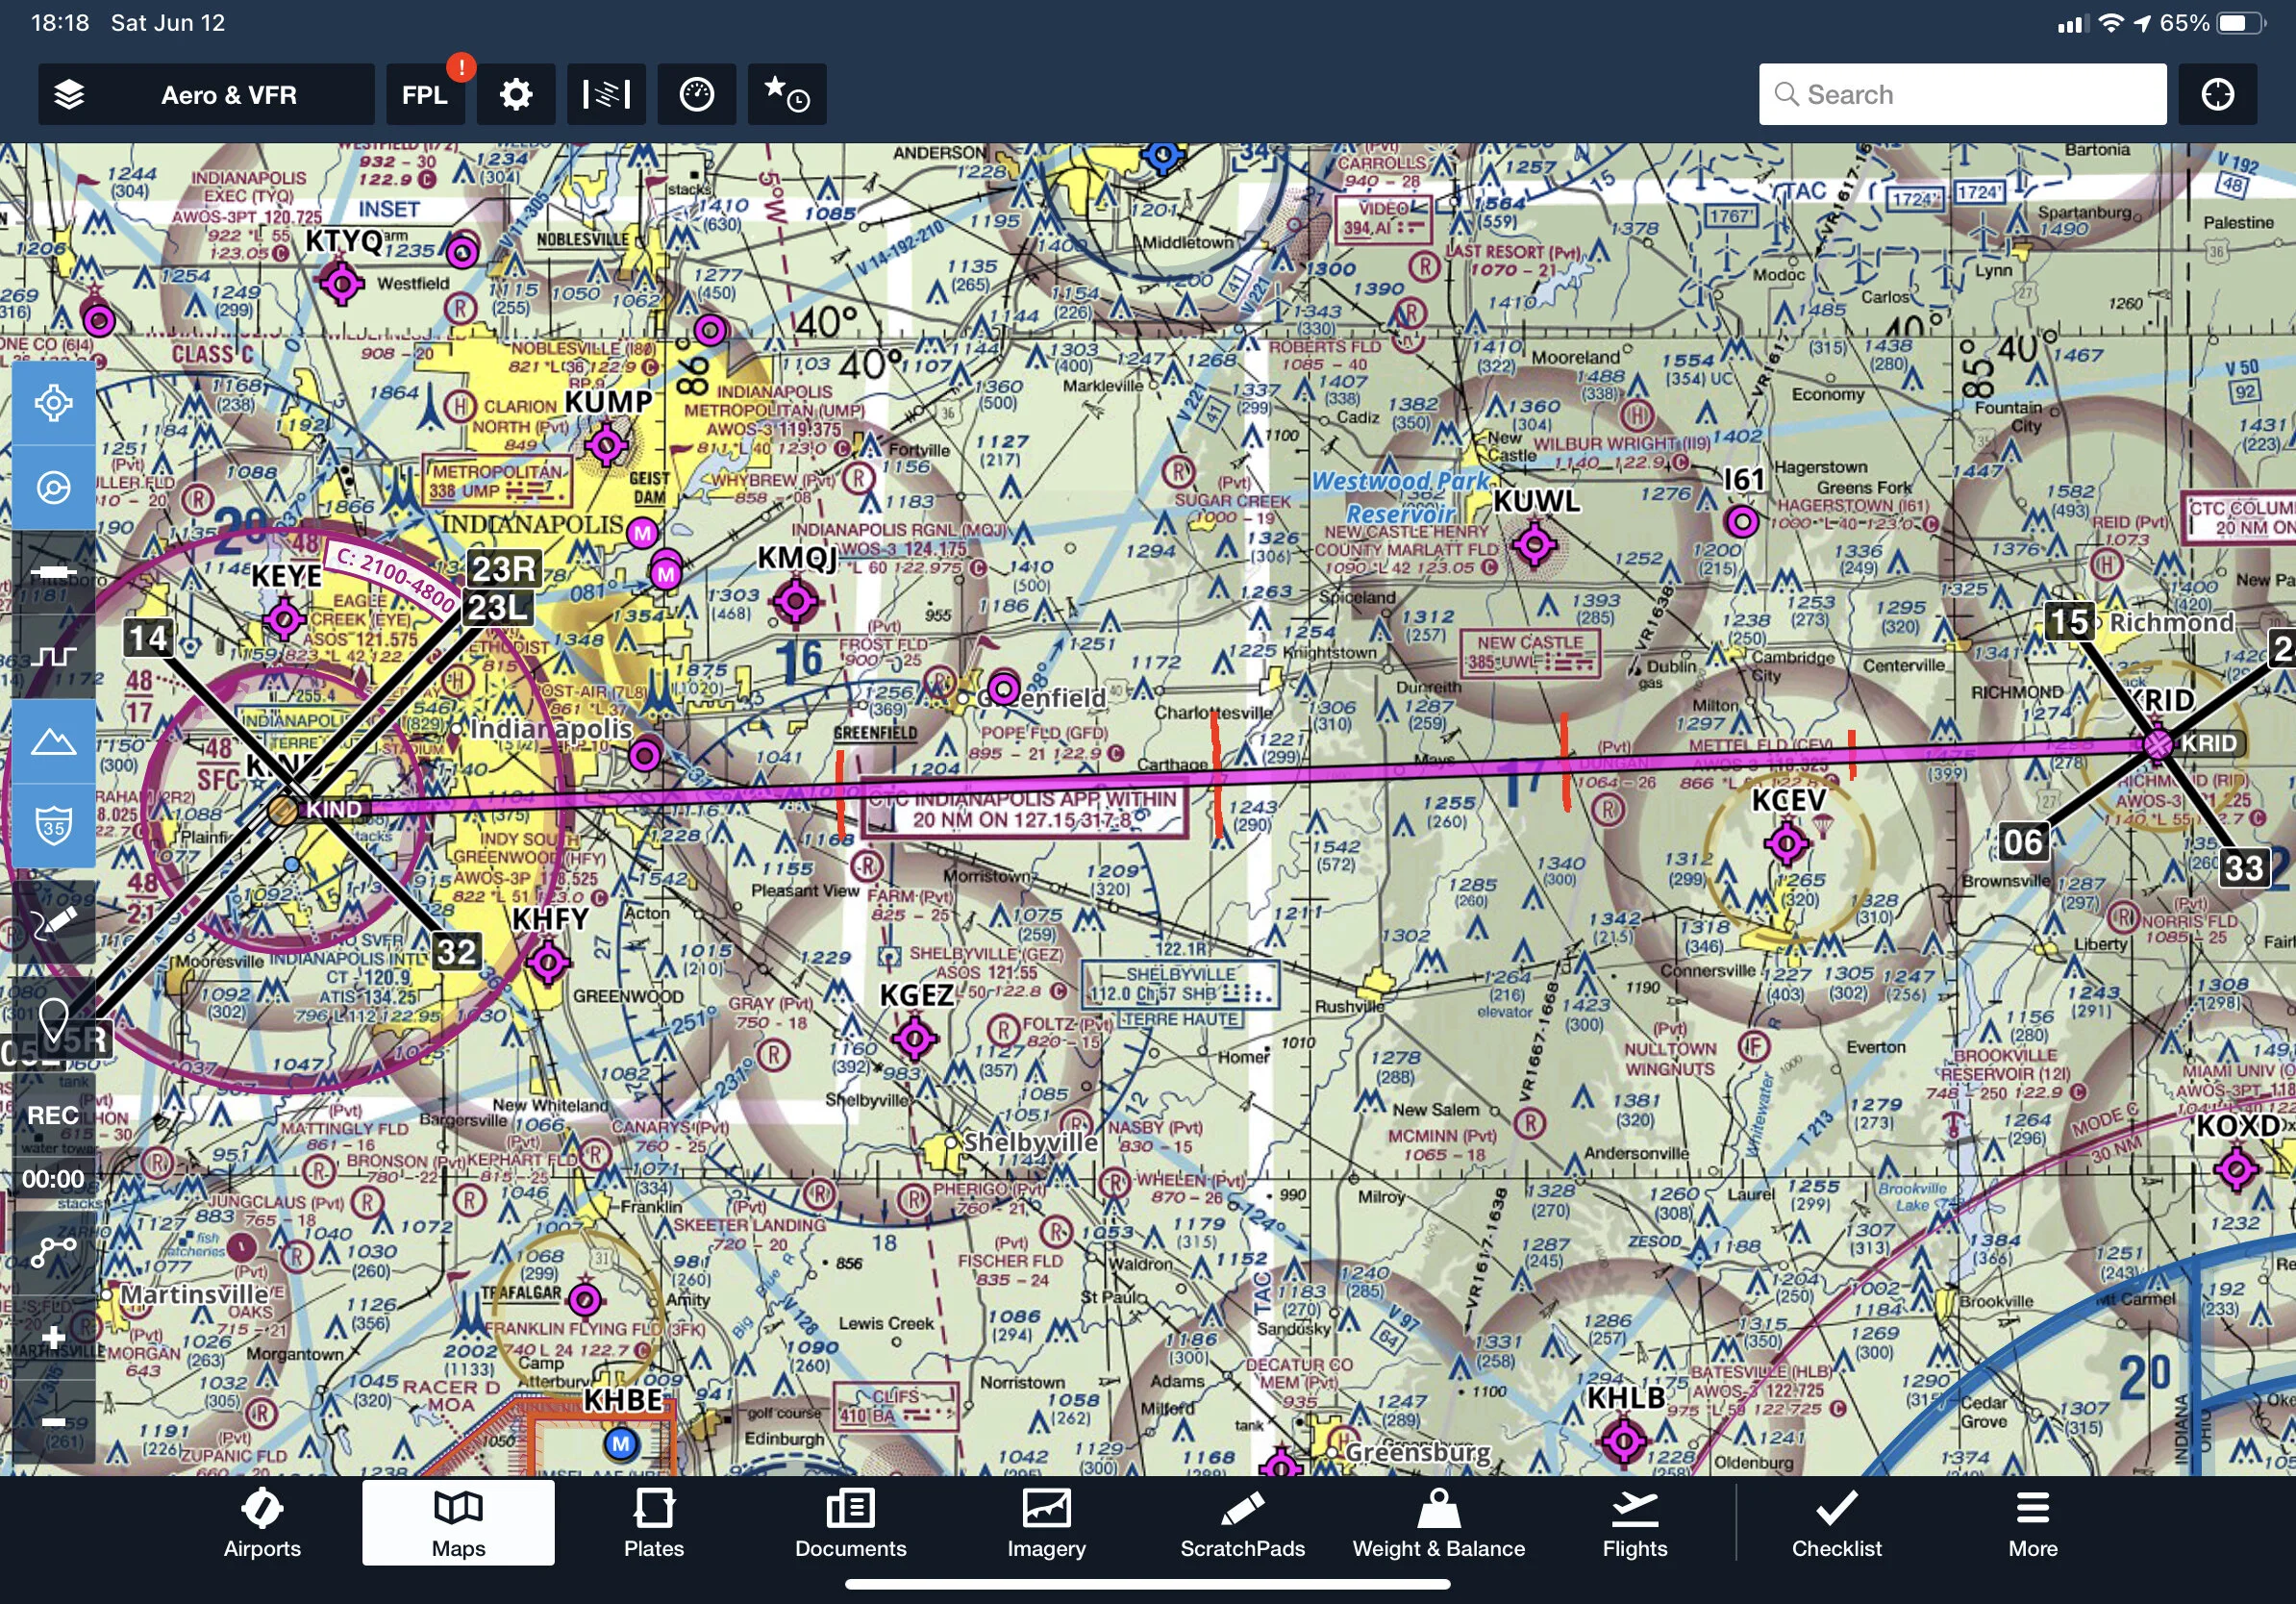
First, annotate our top of climb point at 20 miles out. The beauty of ForeFlight is that you can annotate directly on the map or chart. You’ll see that in the screenshots as I use a simple red line.

Before you select suitable checkpoints along your route, I recommend marking your top of descent, otherwise you’ll get painted into a corner and have to re-do some of your work.
Pattern altitude at KRID is 2,140’. Let’s call it 2,100’. If we’re cruising at 7,500’ and want to be at pattern altitude 3 miles before to the airport, we need to lose 5,400’. Considering a gentle descent rate of 500 fpm, that means we need to start our descent at 10.8 miles out, which we’ll round up to 11.
Annotate the 11 mile top of descent leg on the sectional.

Now we can select checkpoints about every 10-15 miles to fill in the gaps.
My first point, after top of climb, is directly over the town of Carthage. I also have Knightstown to my 11 o’clock as a backup point. This leg length is 13.5 miles.

My next point is a 12.5 mile leg where power lines run north/south. There are also a number of small towns off my left, along highway 40, and the larger town of Connersville to my 1 o’clock. KCEV most likely won’t be easier to spot than Connersville but I made a mental note of it.

The final leg is the distance to my top of descent point, which is 10.2 miles. Let’s call it 10.

Now our route is complete with all checkpoints.
Pull out your paper navlog and record each leg distance, course, and magnetic variation (as seen by the isogonic lines).
Note: The ASA CX-3 can only handle magnetic variation in whole numbers so I just use whatever the closest "whole" isogonic line number is, to the checkpoint in question.
When using the ForeFlight 2-finger ruler method, zoom in tightly for accurate numbers but understand that ForeFlight doesn't provide True Course. To get that number, we need to do something a bit "backwards."
In the case of our first checkpoint, the 2-finger ruler method shows 092° but that accounts for variation. So, first record the variation, "+5" since the direction is West, correctly in the variation field. Second, subtract 5 from 092° and put the result, 087° in the True Course field.
Complete the rest of the checkpoints accordingly.

This part is a little unusual but bear with me.
In ForeFlight, carefully tap and insert checkpoints to your flight plan exactly where you annotated your checkpoints previously.
The rubber band feature may engage, it’s ok for now.

Open up the Flight Plan Editor and select, Send To Flights.

Click on Briefing to retrieve a weather brief and navigate to Forecasts, Winds Aloft Table.
Don’t forget to go through the entire Briefing before your flight.

The reason we just added checkpoints along the route was so that we can now can quickly get accurate winds along our route of flight instead of interpolating with various reporting sites (using the Winds/Temps Data aka Winds Aloft info on AWC).
Record these winds on your paper navlog as they relate to your checkpoints.
Note: For the first and last navlog fields, I like to use the wind data from an intermediate altitude, such as 3,000’ or 3,500’.

Going back to the Time, Fuel and Distance to Climb page in our AFM, we can see that the TAS for 4,000’ is 90 kts. Again, this is something we’re just getting close with, especially as we used the winds aloft data for 3,500’ for our first navlog field.

Visit the AWC Winds/Temps Plots and look up the Temp. Difference for your desired altitude, or close to it. In our case, I checked the difference between, 6,000’ and 9,000’ and there really wasn’t much at all.

Using that information, go into the AFM and look up our Cruise Performance for an altitude close to our cruise altitude. In our case, we’ll have to do some rough interpolating. Since we’re planning for 7,500’ and ISA+15, I’m going to look at the sections for 6,000’ and 8,000’ as well as ISA+10 and ISA+20 to get an idea of the various TAS estimates at 75% power. I’ll select 133 for our TAS in this particular case as I feel it’s a good compromise of the available data.
Record this information on your paper navlog.
For the top of descent true airspeed, I’ve always had good results using 100 kts (for the DA40 NG).
Also make note of the fuel burn for the cruise power setting of 75% load. Record this 6.6 gph fuel burn on the navlog.

Our navlog is now ready to be completely filled out using our E6B.
Press the PLAN button on the CX-3 and fill in all the details you can except Deviation. Unless you know for certain which aircraft you’ll be flying, it’s fine to leave that blank for now.
You can create up to 5 legs in the CX-3 PLAN page and it “remembers” data from the previous entries, so it’s your decision on whether or not you want to make new legs or just edit one leg repeatedly.

Here is an example of some of the first leg’s data output:
Keep in mind that we’re using the AFM’s Time, Fuel and Distance to Climb calculations for most information.

Some things I do:
round the ground speed to the nearest whole number,
round the fuel burn up,
and round the ETE either up or down to the nearest full minute or a half minute. [If you round a leg’s ETE from 5 minutes and 50 seconds to 6 minutes, consider rounding down one of the next leg’s ETE to offset this rounding up. This way it all evens out.]
After you put all available data through the CX-3, your navlog should now be complete.

Delete the individual points from the flight plan editor, leaving just the drawn/annotated points behind.
You can now use the Aerial Map layer to familiarize yourself with your checkpoints. This is great for getting a true lay of the land.

If allowed, you can also plan for cross-referencing checkpoints using appropriate radials from nearby VORs. In our case, this could come in handy for the top of descent as there isn’t a clearly distinct visual landmark for that point. Although KCEV would be just off our right shoulder, sometimes checkpoints not in our immediate field of view are difficult to identify.

Well, there’s my method for planning a cross-country flight using ForeFlight and a paper navlog. Feeling more adventurous? Use the classic whiz wheel E6B. Actually, I think it should be required to learn how one works, so don’t shortchange yourself on that skill. Once you can use the mechanical E6B, switch on over to the electronic. The above method is a great way of using ForeFlight just like a paper chart but with a few tricks to maximize the features of preflight planning.
P.S. Thanks Randy for the correction of the ForeFlight ruler and true course.
Multiengine Rated
